Gift Card Balance
Enter the code below to redeem your gift card
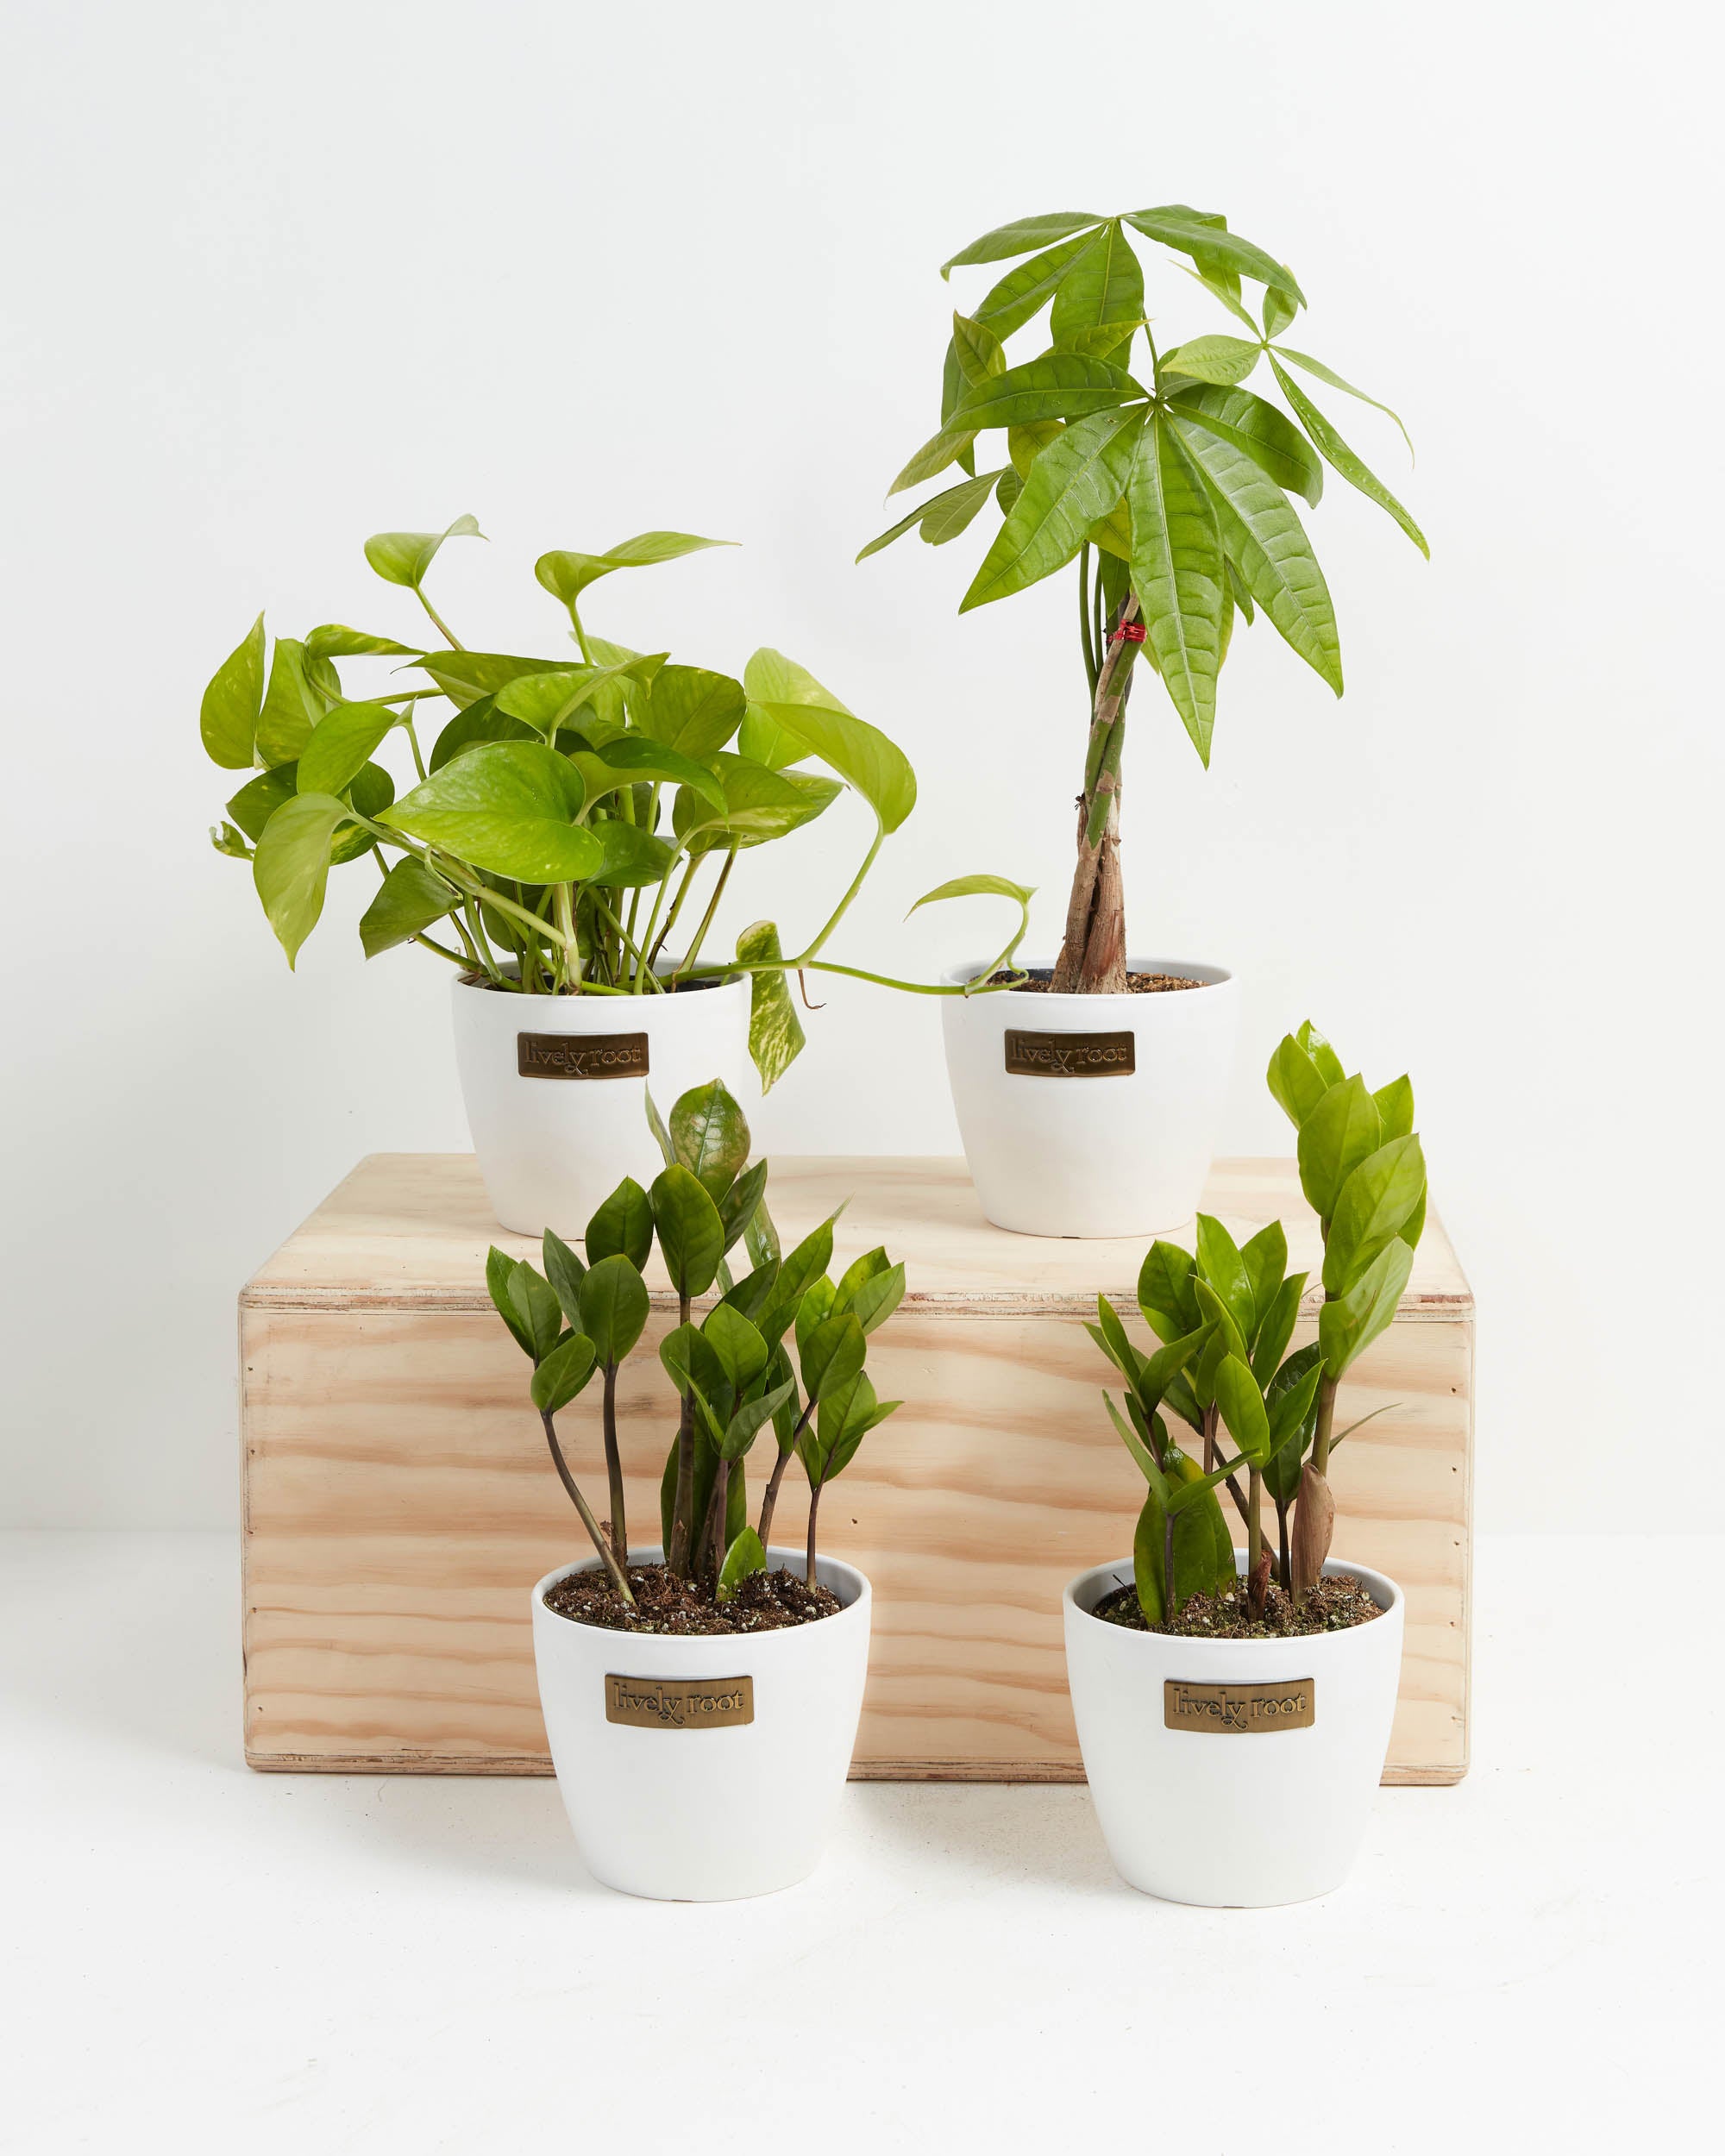
New plant parents can get a confident start with this bundle of three hard-to-kill green babies. Golden pothos are sometimes called devil's ivy because they are so hard to kill. They have gorgeous trailing leaves and look great in a hanging planter. The ZZ plant can also handle low levels of water and light. Finally, the money tree is an easy-care plant that's rumored to bring good luck and fortune.
Care Level: I'm Easy
Pet Friendly: Warning
Toxic to pets if ingested.
Origins: The ZZ is grown in the USA. They are a tropical perennial plant native to eastern Africa, from Kenya south to northeastern South Africa.
Fun Facts: The ZZ plant can ...
The ZZ plant can produce little white, spathe-type flowers near the base of their stalk, which is almost identical to the flowers of a peace lily.
Dutch nurseries started wide-scale commercial propagation of the ZZ plant around 1996.
Bright, indirect light to filtered sun.
Allow the soil to dry out completely between waterings.
Enjoys moderate to high levels of humidity. Spritz occasionally.
Ideally, the Money Tree likes the room temperature at 72°F. They handle warmth rather than cold so keep them away from cold drafts.
Outside: Grow in morning light, partial shade (4-6 hours) where nights are above 45°F.
Indoors: The Money Tree prefers bright, indirect light for at least six hours in a southern, eastern and western windows.
Fertilize bimonthly during their growing period. Use a balanced liquid fertilizer at 1/2 strength. Reduce during the fall and winter months while the plant is in their dormant phase and refrain from watering as much so they can rest.
When receiving the plant, do not repot immediately but wait at least 6-12 months or if the roots are beginning to get crowded and growing through the drainage holes.
Repot in the spring, using a 2" bigger pot to keep the roots drier. (Too big of a pot could cause the soil to dry slower, which is not helpful.) Use a well-draining indoor potting mix with perlite to help with drainage. Water your plant in the old pot before transferring over and let sit an hour. Place a piece of screening at the bottom of the container over the drainage hole to secure the soil and allow to drain.
Add soil to the bottom to elevate the root ball. Lift the plant and release the roots against the existing planter. Use a clean knife or garden trowel to wedge between the pot and the soil to loosen. Inspect the root ball. Notice if there are any dead or rotting roots and trim off with sterile pruners. If the plant is rootbound, cut through the roots to alleviate continued encircling. Ensure the plant is sitting about 1" below the edge of the pot to avoid water spillage. Add more soil and backfill around the sides by tamping down. Fill up to the soil line but not over. Water thoroughly, leaving the soil damp but not soggy. If settling occurs, add more soil.
Prune the leaves to stimulate new growth by cutting in front of a leaf node. Trim off any dead or damaged stems to keep them healthy.
Stem Cutting: In early summer, take a stem cutting, use sharp pruners to remove a cutting from a tip off the vine. Cut at least 4-6 inches of stem to propagate. Place in a vase with water to root. Change the water each week with filtered, bottled, or tap water sitting at least 24 hours. After 3-4 weeks, check to make sure the stem has 1-2 inch, well-formed roots. If so, it is time to plant. *Fill a small container with drainage holes (too large of a container for the cutting will make it challenging to regulate watering needs) using an indoor well-draining potting mix. Mix a little rooting hormone into the soil. Poke a hole in the soil with a pencil. Then, place the cutting in the hole and tamp the soil down around them. Water the plant and keep them in medium to bright indirect sunlight. After 4-6 weeks, the roots should establish.
This plant prefers low to medium light.
Allow the soil to dry out completely between waterings.
This plant doesn't require any extra humidity.
Avoid fluctuations in temperature keeping them away from drafts.
Outside: Grow in filtered morning light where nights are above 50°F.
Indoors: This plant prefers bright, to medium indirect light but can tolerate low light conditions.
ZZ plants grow slowly. Therefore, they don't need a lot of fertilizer. Apply a balanced fertilizer in the early spring and summer at half strength.
When receiving the plant, do not repot immediately but wait at least 6-8 months or if the roots are beginning to get crowded and growing through the drainage holes.
Repot in the spring, using a 2" bigger pot. (Too big of a pot could cause the soil to dry slower, which is not helpful.) Use a well-draining indoor potting mix with perlite to help with drainage.
Water your plant in the old pot before transferring over and let sit an hour.
Place a piece of screening at the bottom of the container over the drainage hole to secure the soil and allow to drain. Add soil to the bottom to elevate the rhizomes that mimic potatoes. Lift the plant and release the roots against the existing planter. Use a clean knife or garden trowel to wedge between the pot and the soil to loosen.
Inspect the rhizomes. Notice if there are any dead or rot and trim off with sterile pruners. If the plant is rootbound, separate the roots and rhizomes if you wish to make more plants. If not, remove any weak leaves off the plant to help revitalize their energy.
Ensure the plant is sitting about 1" below the edge of the pot to avoid water spillage. Add more soil and backfill around the sides by tamping down. Fill up to the soil line but not over.
Water thoroughly, leaving the soil damp but not soggy. If settling occurs, add more soil.
When yellowing leaves occur throughout the season on mature plants, remove them. If stems become too arched or heavy, prune back as needed. To clean, shower them with filtered water or non-fluoridated water.
Indoors: Propagate and divide ZZ plants in the early spring when emerging from dormancy.
Pull from the container and brush or wash away the soil carefully around the rhizomes. Carefully divide and repot in a rich, indoor potting soil mix.
Use a container that has drainage and is deep enough for the roots to have room to grow.
Set in medium to bright, indirect sunlight while they are rooting.
Check the moisture and humidity each day and add misting to keep the soil moist while the roots establish.
After 6-8 weeks, roots will begin to establish. You can tug onto the stem to ensure the roots are anchoring well.
Outdoors:
Carefully loosen the soil and dig the roots up and separate the plant in new locations in your garden.
Add rich, damp, and loamy soil in a filtered morning sun location.
Water with filtered or rain water at the soil level.
This plant loves low to medium indirect light.
Allow the soil to dry out completely between waterings.
Pothos love high levels of humidity. Spritz occasionally.
Ideally, the Pothos grows their best when temperatures are between 70°-90°F.
Outside: Grow in full sun (6-8 hours) to partial shade (4-6 hours) where nights are above 60°F.
Indoors: The Golden Pothos prefers bright, indirect light for at least six hours in a southern, eastern and western windows.
Fertilize every two to three months during their growing period in the spring and summer with a balanced liquid fertilizer or topical granular soil fertilizer. Let the plant rest in the fall and winter.
When receiving the plant, do not repot immediately but wait at least 6-12 months or if the roots are beginning to get crowded and growing through the drainage holes. Repot in the spring, using a 2" bigger pot to keep the roots drier. (Too big of a pot could cause the soil to dry slower, which is not helpful.) Use a well-draining indoor potting mix with perlite to help with drainage.
Water your plant in the old pot before transferring over and let sit an hour. Place a piece of screening at the bottom of the container over the drainage hole to secure the soil and allow to drain. Add soil to the bottom to elevate the root ball. Lift the plant and release the roots against the existing planter. Use a clean knife or garden trowel to wedge between the pot and the soil to loosen. Inspect the root ball.
Notice if there are any dead or rotting roots and trim off with sterile pruners. If the plant is rootbound, cut through the roots to alleviate continued encircling. Ensure the plant is sitting about 1" below the edge of the pot to avoid water spillage. Add more soil and backfill around the sides by tamping down. Fill up to the soil line but not over. Water thoroughly, leaving the soil damp but not soggy. If settling occurs, add more soil.
To clean the leaves and alleviate dust particles: Shower them from above. Fill a watering-can with filtered, distilled, or tap water that has been sitting for 24 hours and is free of chemicals (chlorine or fluoride). Place the plant in a sink and lightly wash the leaves with a shower spray end watering can. Trim off any yellow leaves with sterile scissors. Remove any debris from the soil and replenish soil if needed. Inspect for any insects at this time. Prune the vines up to 2 inches from the soil line to create lushness at the top. As they spills over the rim of the container, trim to maintain their shape and size at your preference. Remove any dried or discolored leaves to keep the plant vigorous.
Stem Cutting: In early spring, take a pothos cutting, use sharp pruners to remove a cutting from a tip off the vine. Cut at least 5-6 inches of stem to propagate. Place in a vase with water to root. Change the water each week with filtered, bottled, or tap water sitting at least 24 hours.
After 3-4 weeks, check to make sure the stem has 1-2 inch, well-formed roots. If so, it's time to plant. *Fill a small container with drainage holes (too large of a container for the cutting will make it challenging to regulate watering needs) using an indoor well-draining potting mix. Mix a little rooting hormone into the soil. Poke a hole in the soil with a pencil. Then, place the cutting in the hole and tamp the soil down around them. Water the plant and keep them in medium to bright indirect sunlight. After 4-6 weeks, the roots should establish.
Division: Divide the Golden Pothos in the early spring when emerging from dormancy. Pull from the container and cut through the roots with a sharp knife or pruners. Repot in a rich, indoor potting soil mix. Use a container 2 inches bigger than the root ball with drainage and is deep enough for the roots to grow. Place the roots at the same level as the previous pot adding soil at the bottom if necessary. Set them in bright, indirect sunlight and water. Check the moisture and humidity each day and add misting to keep the soil moist while the roots establish. After 6-8 weeks, roots will begin to form. You can tug onto the stem to ensure the roots are establishing.
Follow us @livelyroot & show us your #livelyroot plants
Get access to your rewards, referrals, and more